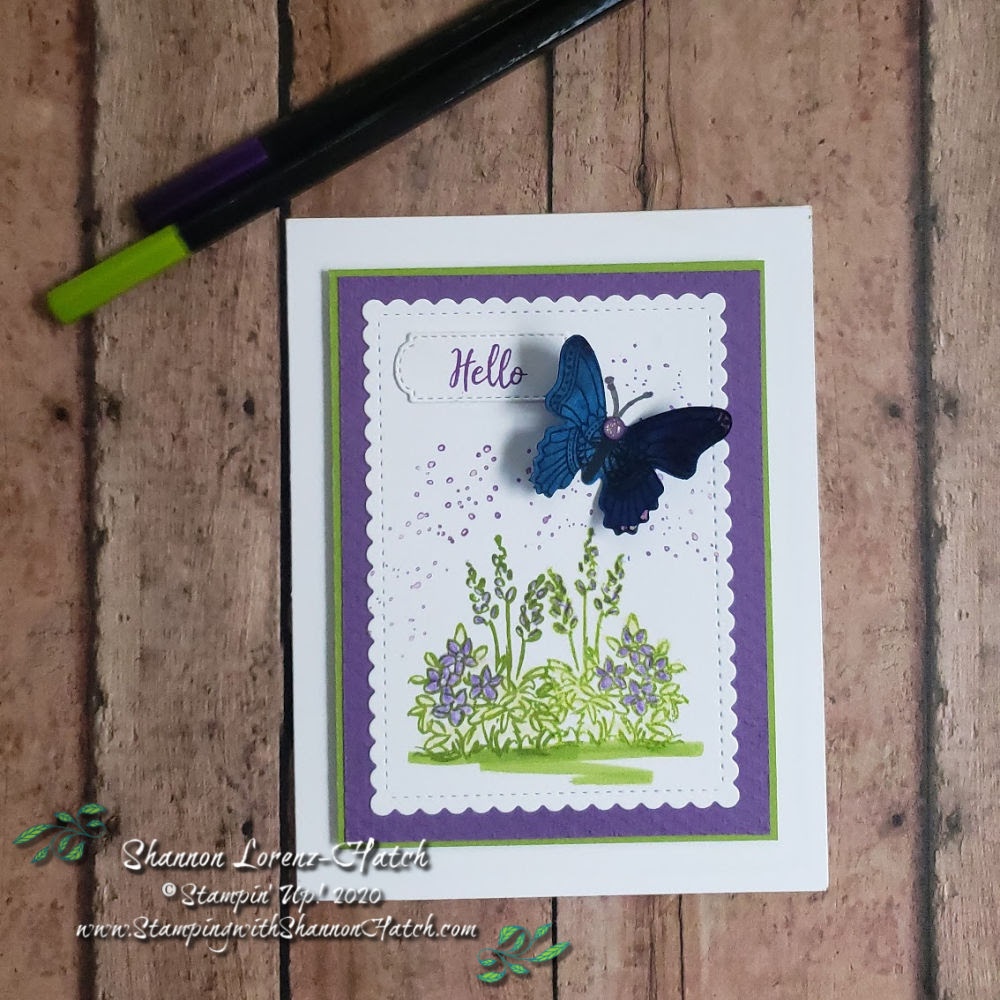
Butterfly Gala in Grace’s Garden.
Hey! Thanks for stopping by my little happy spot. Take a look around and hope you enjoy.
Exciting News!!!! the 2024-2025 Annual Catalog has gone live! Check it out, click on image below for the digital catalog!
OR click HERE to go to the website

Today we are bringing you a bold, summer-inspired color scheme for our Color Challenge #378 at CAS Colours & Sketches. The Stampin’ Up! colors to use as a reference are Gorgeous Grape, Granny Apple Green and Pacific Point. You must use all of the stated challenge colors. You may also use neutral colors; however, the challenge colors should be the most noticeable ones featured on your card. We use Stampin’ Up color names for reference, but you are welcome to use any other companies’ products as long as you match the challenge colors as closely as possible.

So here we go, this is what I have come up with for you.
Love, love, love this color combination, I am so anxious to see what you guys come up with for this challenge. For this card I used Grace’s Garden and Butterfly Gala. I have a great tip for you with Butterfly Gala. If you find yourself to be the Butterfly sort and love using them on your card, pages, journals, etc. I sit down and create backgrounds of all sorts using the inks I have and create a Master Board of sorts. When that surface is completely dry, I stamp the butterfly outlines in Butterfly Gala (also Butterfly Wishes) on the Master Board, then punch them out with the Butterfly Duet Punch. Big Butterflies, small butterflies, all created at the same time in all sorts of different colors – ready to go. Click HERE to see the post I have for these Butterflies.
The card comes together pretty easily. I started with a Granny Apple Green mat, attached a piece of Gorgeous Grape card stock that is dry embossed with the Tasteful Textile 3D embossing folder. On piece of Whisper White cardstock I created my scene from Graces Garden in Granny Apple Green. This scene uses the stamping technique that creates the mirror image. Using the Stamparatus and the Silicone craft mat, stamp the image onto the craft mat, place your card stock over the image on the craft mat, give it a back rub and there ya go! I do recommend stamping the mirror image first and then working around it. Once I had both images stamped out I colored the images with the Granny Apple Green and Gorgeous Grape water color pencils. On another piece of Whisper White cardstock, I stamped the same floral image from Grace’s Garden a 2nd generation stamping shade of Granny Apple Green, then colored with the same watercolor pencils. I cut out the front scene with the largest Stitched so Sweetly Scalloped Rectangle die. Attached all the mats together with liquid glue. Once all together, I attached fun foam to the back of the panel and then attached everything a Thick Whisper White Card base. Once that was in place I attached the Butterfly with liquid glue. The greeting “Hello” is stamped in Gorgeous Grape and comes from Grace’s Garden stamp set. The die used to cut out the greeting is from the All Dressed Up dies. Another technique at play here by shortening the die cut (cutting a portion, then adjusting die to fit the length needed while not overlapping the already cut other side) to fit the greeting.
The inside Whisper White liner is attached to a Gorgeous Grape mat and then attached inside the card. I added another previously created tiny butterfly.
Thanks again for stopping by and spending a bit of your time with me. I hope you enjoyed learning about how this card came together. Hopefully you were even inspired just a bit. Below are pictured links to all the items used for this card, click the link of the item to be taken to my online store where you can learn more about each item. If you would like to learn more about this challenge or to see what other talented designers have created for this challenge, hop on over to CAS Colours & Sketches. I will return soon with something new. Until then, stay safe, and by all means keep crafting, exploring and creating. See you soon.
Product List
Don’t miss a thing – Here are our current promotions

August 2023 Gifting Code: EBWQGUU9
Please DO use this gifting code if your order is under $150 to receive a free gift from me. If your order is over $150 DO NOT use the host code and receive Stampin’ Rewards, anything in the catalog, that amounts to $15 or more (depending on the amount of your order) from Stampin’ Up! If your order is over $125, consider getting a starter kit for $99 with free shipping. No selling required, sit back and enjoy your hobby while enjoying a 20% discount with every order you make. Contact me if you have any questions.

If you are unfamiliar with this promotion, every $50 USD/$60 CAD you spend by 3 August 2020 (before shipping and tax) earns a $5 Bonus Days coupon code that can be used 4–31 August 2020.
Bonus Days Details
- An email address is required to participate; Bonus Days coupon codes can be delivered only via email.
- If a participant earns multiple codes from a single order, they will receive one email with multiple codes. If they earn multiple codes from multiple orders, they will receive separate emails for each code earned.
- All order types qualify for this promotion. Fax and email orders still require an email address.
- Orders that are started before the promotion begins will not go toward earning coupon codes.
- There is no limit to the number of coupon codes participants can earn per order or throughout the duration of the Bonus Days earning period.
- You can use your Bonus Days coupon code to apply toward a Paper Pumpkin prepaid subscription during the Redeeming period. You can also earn Bonus Days Coupons by purchasing any subscription to Paper Pumpkin during the earning period.
- Please note that Bonus Days benefits do not apply to month-to-month Paper Pumpkin subscriptions.
May 2024 Paper Pumpkin Kit
About the Kit:
JULY: Painted Petals
Subscribe 11 June–10 July by clicking here!
Craft beautiful cards with unique watercolor designs and pretty layers!
• Makes 9 cards: 3 each of 3 designs
• Project includes printed cards and coordinating envelopes
• Precut paper pieces and embellishments
• Coordinating colors: Calypso Coral, Gray Granite (Classic Stampin’ Spot), Melon
Mambo, Mossy Meadow, Old Olive
Paper Pumpkin Exclusive July – September Coordinating Add-on Die
Subscribers can also shop the exclusive Every Celebration Dies, which coordinates with April, May and June.
164991 Paper Pumpkin Every Celebration Dies.

Paper Pumpkin Subscription information:
Subscribe to the April Paper Pumpkin Kit between 11 June–10 July by clicking here!
Paper Pumpkin Subscription Options
Do you need a new Die-cutting/Dry Embossing machine? The standard size Stampin’ Cut & Embossing Machine is here! The first release will be the standard size machine that will be able to handle the larger size dies and dry embossing folders. Notice in the picture, there is a mini version that will be released a little bit later.
Our Stampin’ Cut & Emboss and Mini Stampin’ Cut & Emboss Machines offer multiple die cutting and embossing options for you. Both of the Stampin’ Up!-exclusive machines offer the highest quality and make precise cuts and detailed embossed images every time. They’re also simple to store and easily portable, which makes packing a cinch! They come with all the tools needed to get started right away, making it easy for you to have a fantastic die-cutting and embossing experience from the start.
Check out more details in the chart below ….the Mini…..is tooo cute!
Machine Highlights
| STAMPIN’ CUT & EMBOSS MACHINE | MINI STAMPIN’ CUT & EMBOSS MACHINE |
| Wide 6″ (15.2 cm) platform for all your crafting needs. | Smaller 3-1/2″ (8.9 cm) platform for your on-the-go crafting options. |
| Weighs approximately 8.1 pounds (3.67 kg). Platform folds to make transporting easy and to take up less space when storing. | Weighs approximately 2.7 pounds (1.22 kg). Lightweight, compact, and portable. Platform folds to make transporting easy and to take up less space when storing. |
| Works with all Stampin’ Cut & Emboss dies and embossing folders. | Works with Stampin’ Cut & Emboss dies and embossing folders that are narrower than 3-3/8″ (8.6 cm). Dies and embossing folders that are compatible with the Mini Stampin’ Cut & Emboss Machine are indicated in the product description in our catalogs and online store. |
| Simple to make a sandwich. Includes plates that are labeled with a number and are color coded for easy use. | Simple to make a sandwich. Includes plates that are labeled with a number and are color coded for easy use. |
| All the plates you need to get started are included: 1 Base Plate (Plate 1), 1 Die Plate (Plate 2), 2 Cutting Plates (Plate 3), and 1 Specialty Plate (Plate 4). | All the plates you need to get started are included: 1 Mini Base Plate (Plate 1), 2 Mini Cutting Plates (Plate 2), 1 Mini Embossing Plate (Plate 3), and 1 Mini 3D Embossing Plate (Plate 4). Note: 3D embossing folders that are compatible with the mini machine are not part of our initial product launch, however we anticipate being able to add these to our product offering later in 2021. |
| Great for seasoned crafters who want a solution for all their die cutting and embossing needs. | Perfect for new or casual crafters who want a smaller machine that offers a high-quality die-cutting and embossing experience. It’s also great for all crafters who like to create on the go. |


